Draft Logo Project

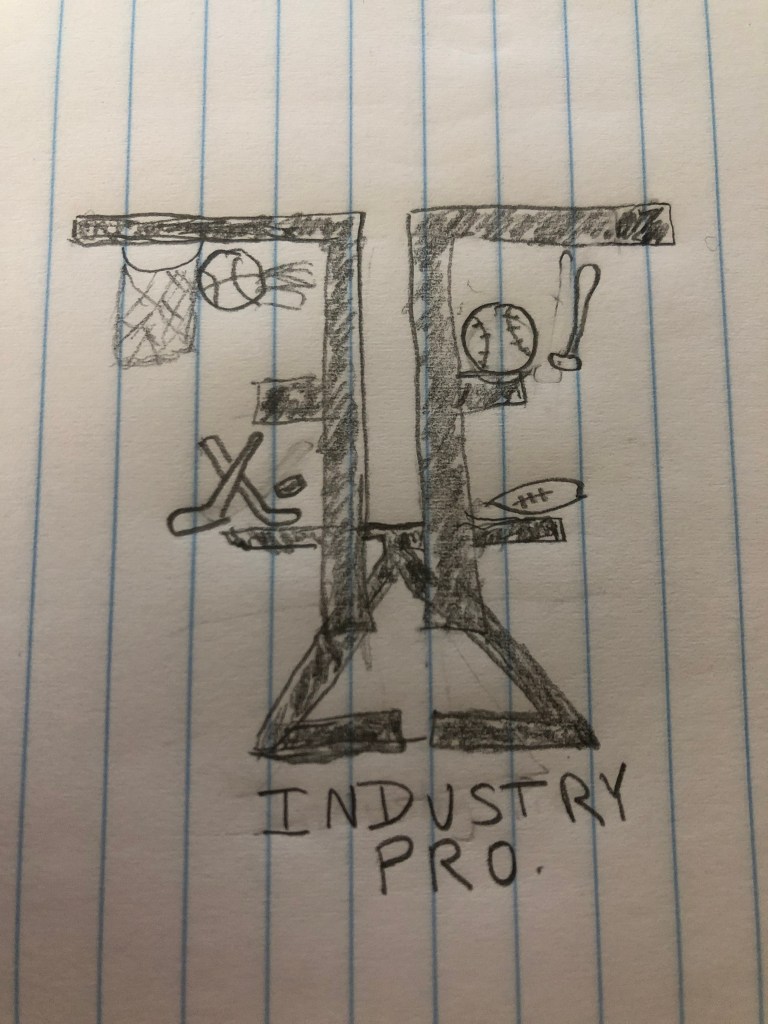
For this logo draft project, I decided to a create a design that incorporates my initials as well as a few graphics. The project design I created directly relates to my course topic. This logo could be something that I potentially use to market myself for my future career. My course topic is the path I’ve taken and plan to take in the sports management industry. I used my initials because this topic is focused around my personal path. The sports objects incorporate potential sports I would work for once I am in the field. 

For the design process, I gained inspiration from a website centralized around creating a personal logo. This page outlined expert tips in designing the logo itself and how to best represent your personal brand. I was also influenced through my research online of other sports agent logos in the industry. These elements are significant as they represent who I am and the brand I wish to promote to those who could hire me. To begin my design process, I started to research various logos of professionals in the sports management world. From here I used that inspiration to sketch my logo and transfer it to the artboard.

To create the various elements, I used in this project I primarily utilized the ellipse tool as well as the text tool. I only used elements that I created rather than using the work of others. To begin the process, I first inserted a circle to outline the logo by using the ellipse tool. From there I selected the circle to edit and selected the mop format design and set it to six points. To continue I utilized the text tool within illustrator to type my initials in separate boxes. I selected my initial F and used the effect texture and the craquelure option. From there, I selected my other initial and used the effect formatting under pixelate and the crystalize option. I grouped these initials once I used the move tool to place them in my desired location. Once grouped I duplicated the text and then reflected it. I positioned both sets of initials using the move tool and sent the Z to the back using the arrange option. I again utilized the elliptical tool to create the basketball and baseball. By using the arc tool, I was able to create the seams of the balls themselves. A few of the technical challenges I encountered were ensuring that the seams of the balls were curved using the arc tool. I noticed that the arc tool can be difficult to accurately place the arc. However, I found that placing the arc point farther from where you intend will allow the arc to be more defined. 

Inspiration: https://www.designhill.com/design-blog/expert-tips-to-create-a-personal-logo/

https://99designs.com/logo-design/contests/sports-management-company-logo-633775

My Logo Sketch

With this logo sketch I plan to use my initials and reflect them with Illustrator tools. I hope to successfully incorporate different sports objects of the industry I hope to be working in one day.

Final Graphic Design Project

Initial Draft

In creating my initial draft, I had no clue where I was headed with the design of the brochure. Upon completion of the draft I came to really enjoy the design I created. During that process, I used a variety of tools however my editing process was fairly basic. To create these bubbles, I placed embedded images I had taken at various professional sports venues. I then used the elliptical marquee tool to create the shape. I took the idea from the brochures and decided to use Martin Stadium as my base layer. I later placed an embedded image of myself and used the magnetic lasso tool to cutout my figure. Once all images were embedded and cutout I used the move tool to place the photos in the correct spots. Using the text tool, I created a title of the brochure and utilized the warp text future to create a flag being pulled by an airplane. As you can tell I used the bare minimum for formatting and editing options. 

Peer Feedback

In considering the peer feedback I received overall, I found it to be very useful. My peers provided me with great insight and ideas to help finalize my project. A couple people discussed how they thought adding borders around my thought bubbles would really bring the concept to life. Additional feedback that was common was the idea that the background needed to be blurred or lightened. My peers mentioned that with a lighter background effect it would not take away from the forefront images. A comment that I considered was applying a gradient to the text. One of my peers also mentioned that the airplane in my initial post was not fitting. 

Final Revisions

The revision process to complete my final draft was fairly extensive. I began with scaling down the size of my thought bubbles using the edit transform and scale feature. I then removed the embedded airplane image by deleting the layer. From there I decided to emphasize the thought bubbles. I did this by using the elliptical marquee tool and later selecting the area. With the oval selected I used the paint bucket tool to fill in the selected oval. This created a border effect around the embedded images. To enhance the background based off of the feedback I received I used the filter tool from above to select stylize editing option. Under stylize I chose the wind effect. From there I was able to select the depth of the effect. Overall my revision process focused on more fine details. 

Graphic Design Brochure

Idea & Inspiration

This photo I created depicts a story of my planned path to my future career. The background image is where it’s all going to start. In the heart of Martin Stadium, working with Washington State University athletics in the marketing department. Currently I work in the stadium as a game day intern. From this position, I hope to gain experience to eventually be promoted to a full-time marketing intern. These positions will help me take steps to my future dreams of working at the college level and hopefully one day to obtain a position under a professional sports organization. I gained insight and inspiration from a few places. One of the sources included a podcast from a woman in the same career industry. This sports management podcast outlined her path and the steps she took to get the position she has today. 

Considering my idea for the brochure, I used my inspiration files that consisted of various college programs in the industry. Their brochures often depicted students in the industry. These students were working hands on in a sports venue including arenas and stadiums. One specific pamphlet from Cazenovia College displayed a student on a soccer field and listed other internships he had gained through their Sport management program.

Technical Detail

The images I used in the mind bubbles are depicting similar steps the woman from the podcast took to become successful. To create these bubbles, I placed embedded images I had taken at various professional sports venues. I then used the elliptical marquee tool to create the shape. I took the idea from the brochures and decided to use Martin Stadium as my base layer. I later placed an embedded image of myself and used the magnetic lasso tool to cutout my figure. Once all images were embedded and cutout I used the move tool to place the photos in the correct spots. Using the text tool, I created a title of the brochure and utilized the warp text future to create a flag being pulled by an airplane. A few challenges I encountered was ensuring that my images were transformed to the correct scale without warping or shrinking the images. I also struggled to use the magnetic lasso tool as it was difficult to accurately cutout my desired portion of the image. I recommend to others to try and use an alternate cutout tool going forward. 

Sources & Materials

https://www.cazenovia.edu/management/sport-management/brochure

https://www.workinsports.com/blog/

My path in the Sport Management Industry.

In choosing the topic for my blog post, it took some time and consideration. After weighing all of my options I decided that my course topic would be a map about the various steps I have taken, and need to take in order to achieve my professional goals. I chose this topic as its currently the most relevant aspect of my life. As of right now I’m a junior at Washington State University working to pursue my degree and gain experiences that will ensure I am marketable for the industry.

I will document my own personal work experiences as well as network events and interactions with others. I plan to take pictures at the sporting events I attend and volunteer for this fall. I also plan to get the permission of the people in the industry who I interact with so that I can collect raw interview and audio footage.

In considering the units that we will be covering with Adobe I have a few ideas using Adobe Audition and Photoshop. With Adobe Audition in unit three I will use SoundCloud to record myself and tell the story of my experiences thus far in Sports Management jobs as well as networking interactions. With Adobe Photoshop I will use the design features to create and image of myself. The background of the image could be of professional sports stadiums that I have attended with other design elements incorporated.

Inspiration File Links: https://www.sportsmanagementworldwide.com/smww-blog.

In this link, there are a series of blogs from professionals from the industries discussing there experiences as well as opportunities.

https://podcasts.apple.com/us/podcast/sports-leadership-podcast/id1184745265?mt=2

This apple podcast will provide inspiration about a different section of the industry, regarding working with athletes in an education setting.

https://99designs.com/logo-design/contests/create-next-logo-olp-sports-agency-259049

The above link is an example of sports agency and a contest they hosted to help design their own logo. I can gain inspiration for my own logo through this website.

My First Blog Post

Be yourself; Everyone else is already taken.

— Oscar Wilde.

This is the first post on my new blog. I’m just getting this new blog going, so stay tuned for more. Subscribe below to get notified when I post new updates.

Introduce Yourself (Example Post)

This is an example post, originally published as part of Blogging University. Enroll in one of our ten programs, and start your blog right.

You’re going to publish a post today. Don’t worry about how your blog looks. Don’t worry if you haven’t given it a name yet, or you’re feeling overwhelmed. Just click the “New Post” button, and tell us why you’re here.

Why do this?

  • Because it gives new readers context. What are you about? Why should they read your blog?
  • Because it will help you focus you own ideas about your blog and what you’d like to do with it.

The post can be short or long, a personal intro to your life or a bloggy mission statement, a manifesto for the future or a simple outline of your the types of things you hope to publish.

To help you get started, here are a few questions:

  • Why are you blogging publicly, rather than keeping a personal journal?
  • What topics do you think you’ll write about?
  • Who would you love to connect with via your blog?
  • If you blog successfully throughout the next year, what would you hope to have accomplished?

You’re not locked into any of this; one of the wonderful things about blogs is how they constantly evolve as we learn, grow, and interact with one another — but it’s good to know where and why you started, and articulating your goals may just give you a few other post ideas.

Can’t think how to get started? Just write the first thing that pops into your head. Anne Lamott, author of a book on writing we love, says that you need to give yourself permission to write a “crappy first draft”. Anne makes a great point — just start writing, and worry about editing it later.

When you’re ready to publish, give your post three to five tags that describe your blog’s focus — writing, photography, fiction, parenting, food, cars, movies, sports, whatever. These tags will help others who care about your topics find you in the Reader. Make sure one of the tags is “zerotohero,” so other new bloggers can find you, too.

Blog at WordPress.com.

Up ↑

Design a site like this with WordPress.com
Get started